
SBS Online Sync - Local Install for PS Financials
This guide will cover installing SBS Online Sync on a local PS Financials server. For an in-depth guide to using and configuring SBS Online Sync once it has been successfully installed, please see the SBS Online Sync User Guide.Installing SBS Online Sync
The SBS Online Sync installer for Windows can be downloaded here: [EXE file]. SBS Online Sync should be installed alongside PS Financials so that your intended users can easily access it. Where this will be depends on how your users access the PS Financials software and server. For example, if your users use Remote Desktop Protocol [RDP] to connect directly to the server and access PS Financials from there, it should be installed directly on the server under their login profile. However, if your users have the PS Financials client installed on their desktop and connect to PS Financials server across your network, SBS Online Sync should be installed alongside PS Financials on their desktop. To install SBS Online Sync, simply run the installer linked above. Note: SBS Online Sync contains an auto-updater which will automatically detect and install new versions of itself when it is run. For this to function correctly, your users will need to have 'write' access to the software and the directory it is installed in. It is therefore suggested that the software is installed in the user's home directory. If this is not appropriate for your internal ICT policy, then whenever a new version is released you will have to log on as an administrative user and execute SBS Online Sync to update the software.Creating a Database User
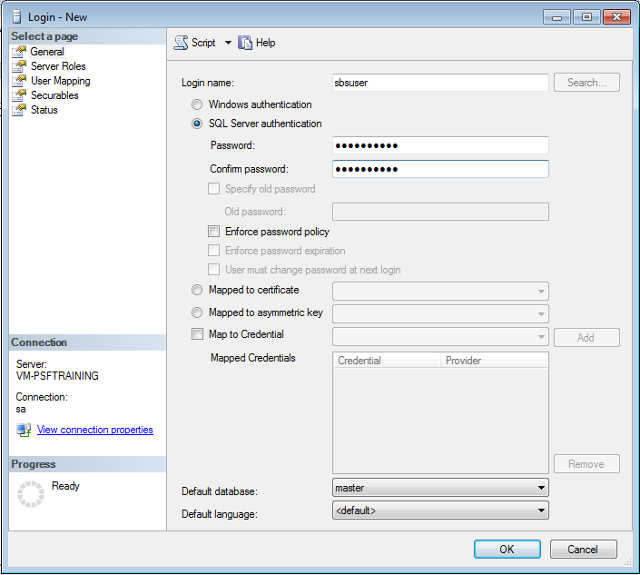
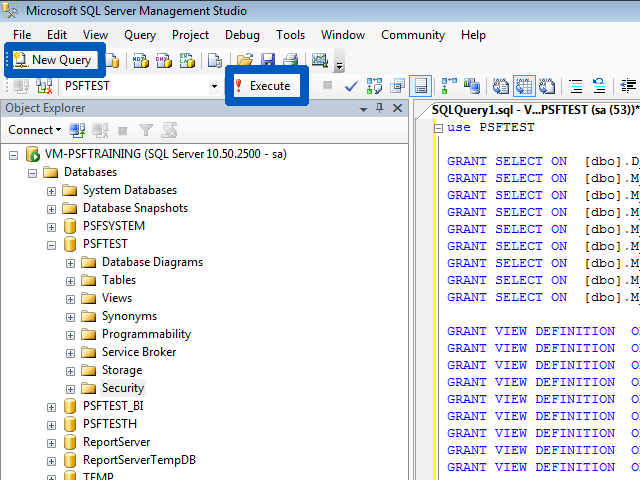
To read data from PS Financials, SBS Online Sync needs to be able to connect to its database. To achieve this, a new database user (with limited permissions) needs to be created on the PS Financials server. The following steps and screenshots were taken using SQL Server Management Studio 2008, however they should be broadly correct in other versions as well. Step 1. Access the PS Financials server and log into SQL Server Management Studio as an administrative user (ie. a user who has permissions to create other database users).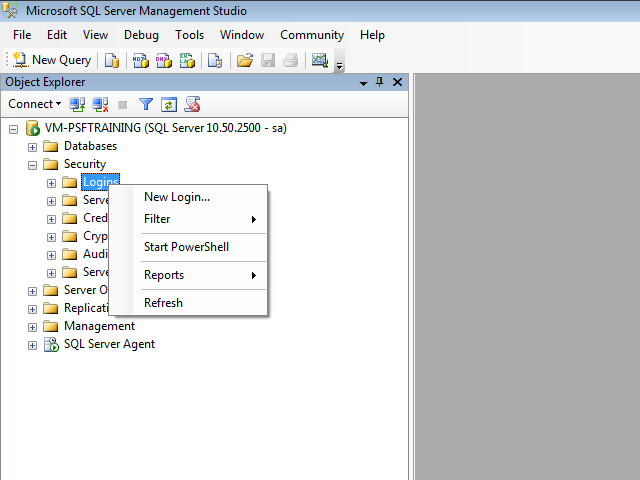

use ADD DATABASE NAME HERE
GRANT SELECT ON [dbo].D_NOMANALYSIS TO [sbsuser]
GRANT SELECT ON [dbo].M_ACCOUNT TO [sbsuser]
GRANT SELECT ON [dbo].M_APBAL TO [sbsuser]
GRANT SELECT ON [dbo].M_APBUDGET TO [sbsuser]
GRANT SELECT ON [dbo].M_BUDGET TO [sbsuser]
GRANT SELECT ON [dbo].M_COMMITMENTS TO [sbsuser]
GRANT SELECT ON [dbo].M_NOMINAL TO [sbsuser]
GRANT SELECT ON [dbo].M_NPBUDGET TO [sbsuser]
GRANT SELECT ON [dbo].M_PERIOD TO [sbsuser]
GRANT VIEW DEFINITION ON [dbo].D_NOMANALYSIS TO [sbsuser]
GRANT VIEW DEFINITION ON [dbo].M_ACCOUNT TO [sbsuser]
GRANT VIEW DEFINITION ON [dbo].M_APBAL TO [sbsuser]
GRANT VIEW DEFINITION ON [dbo].M_APBUDGET TO [sbsuser]
GRANT VIEW DEFINITION ON [dbo].M_BUDGET TO [sbsuser]
GRANT VIEW DEFINITION ON [dbo].M_COMMITMENTS TO [sbsuser]
GRANT VIEW DEFINITION ON [dbo].M_NOMINAL TO [sbsuser]
GRANT VIEW DEFINITION ON [dbo].M_NPBUDGET TO [sbsuser]
GRANT VIEW DEFINITION ON [dbo].M_PERIOD TO [sbsuser]
GRANT DELETE ON [dbo].M_APBUDGET TO [sbsuser]
GRANT DELETE ON [dbo].M_NPBUDGET TO [sbsuser]
GRANT UPDATE ON [dbo].M_APBUDGET TO [sbsuser]
GRANT UPDATE ON [dbo].M_NPBUDGET TO [sbsuser]
GRANT INSERT ON [dbo].M_APBUDGET TO [sbsuser]
GRANT INSERT ON [dbo].M_NPBUDGET TO [sbsuser]
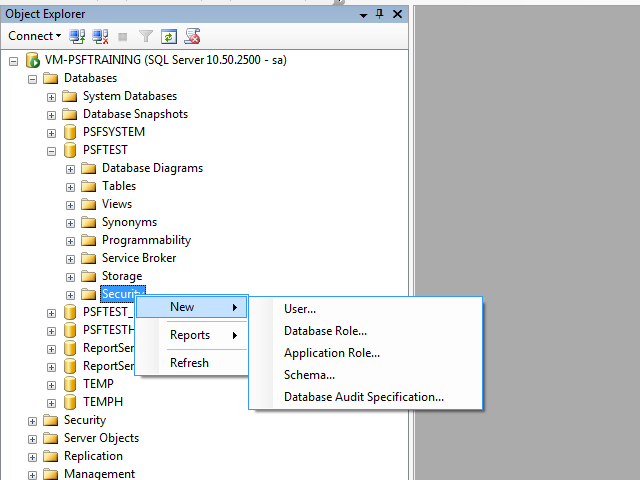
Creating a Database View (PSF version 6 only)
If your version of PS Financials is version 6 or greater, you will need to perform this small extra step to create a database view. Similar to the user permissions in the previous step, create a New Query in SQL Management Studio, copy and paste in the following text, and hit the Execute button.CREATE VIEW [M_APBAL] AS
SELECT LEDGER, NOMINAL, ACCOUNT, YEARCODE, PERIOD, SUM(VALUE) AS Balance, COUNT(*) AS DetCount, SUM(ACCCURRENCY) AS AccCurrency, SUM(USERVALUE) AS UserValue, COMPANYCODE
FROM dbo.D_DETAILS
GROUP BY LEDGER, NOMINAL, ACCOUNT, YEARCODE, PERIOD, COMPANYCODE
HAVING (LEDGER IS NOT NULL) AND (ACCOUNT IS NOT NULL)