SBS Online Sync User Guide
SBS Online Sync User Guide
SBS Online Sync allows you to seamlessly transfer data between your SBS Online planner and third-party applications, such as PS Financials, with the click of a button.
This guide will cover installing, configuring and using SBS Online Sync. Legal bit: Please note that SBS Online Sync is provided 'as is' with no guarantee or warranty. School Business Services is not liable for any data lost or modified due to the use or misuse of SBS Online Sync. By using or installing SBS Online Sync you agree to this.Note for Multi-School users: Some parts of SBS Online Sync have additional functionality for Multi-School planners. Look out for notes like this one for extra or modified functionality.
Installation
SBS Online Sync is a Microsoft Windows application, and needs to be installed on the same computer or network as the third-party application you wish to synchronise with. For PS Financials, it will need to be installed either on your PSF Cloud server; or, in the case that your school hosts PS Financials on premises, it will need to be installed on your PS Financials server or a desktop computer on the same network as the PS Financials server.Installing on a cloud sever
Normally, your user account on a cloud server will have severely limited permissions and will not be able to install software. Therefore, to install SBS Online Sync on a cloud server you will need to contact your PS Financials account manager or technical support contact and ask that they install it for you. To contact PS Financials technical support please see their contact page: https://www.psfinancials.com/customer-support/.Installing on premises
If your school hosts your third-party application, such as PS Financials, on premises, you should contact your internal IT team and have them install SBS Online Sync directly on the server or your desktop machine. Please see our detailed guide here: SBS Online Sync – Local Install for PS Financials.Main Screen Overview
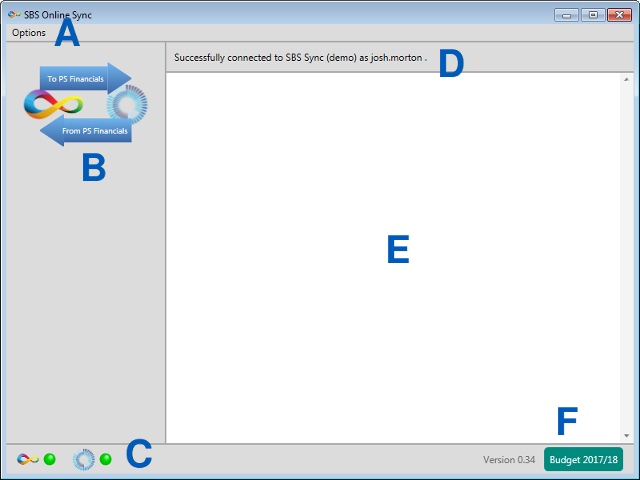
- A: Options menu; use this to configure your connection to your SBS Online planner or third-party applications.
- B: Synchronise buttons; use these to transfer data to or from your SBS Online planner. In this example, clicking the top left-to-right arrow marked To PS Financials will copy data from your SBS Online planner to your PS Financials install, whereas clicking the bottom right-to-left arrow marked From PS Financials will copy data from your PS Financials install to your SBS Online planner.
- C: Status lights; show green when successfully connected to a service, orange when failed to connect, or grey if no connection settings are present.
- D: SBS Online status messages; displays information about the SBS Online planner you have connected to.
- E: Message display; shows messages during synchronisation.
- F: SBS Online budget; when successfully connected to your SBS Online planner, displays the 'Default' budget which will be used as a target for synchronisation.
Connecting to Your SBS Online Planner
The first step you will need to perform after installing SBS Online Sync is connecting to your SBS Online planner. This is simple and requires just the URL of your planner and your username and password. To access the connection settings, click Options -> SBS Online settings.... This will display a dialog box as seen in the screenshot.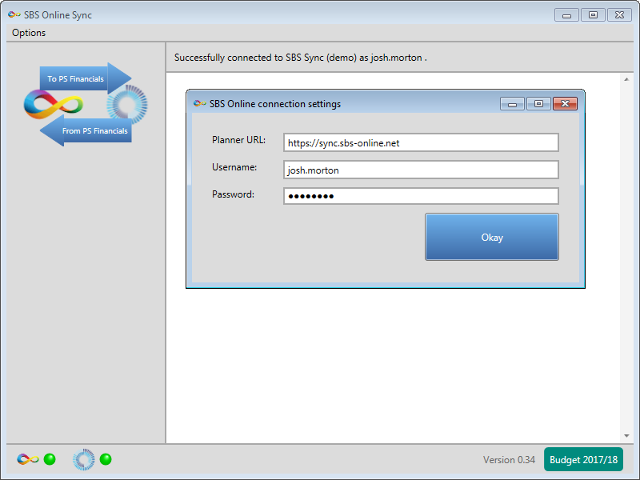
Synchronising with PS Financials
SBS Online Sync can be used to copy both codes and data between your planner and PS Financials. Budget Codes (or 'Nominal Codes' in PS Financial parlance), Unmappable Codes ('Balance Sheet Nominals'), and Cost Centres ('Account Codes') can be copied from PS Financials into your SBS Online planner, ensuring your chart of accounts is consistent between the two systems. Your SBS Online Budget Monitor and Profile Monitor can be completed with a single click, using up-to-the-minute data from PS Financials. Lastly, profiled budget plans can be copied from SBS Online into PS Financials in a single action.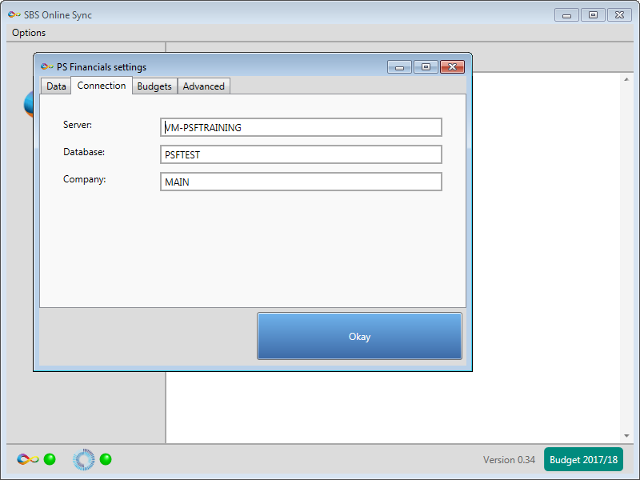
Connecting to PS Financials
To configure your connection to PS Financials, click Options -> PS Financials settings... and click on the Connection tab. This will display a dialog box as seen in the screenshot. Server, Database and Company need to be populated. The easiest way to get these correct is to copy and paste them directly from the PS Financials login dialog (note that you can ignore the 'Username' and 'Password' fields from this dialog). For a PSF Cloud install, the Server field is likely to simply be a period ('.'). After populating these fields and clicking Okay, SBS Online Sync will attempt to connect to PS Financials. You should briefly see the text 'Checking connections...' appear beside the budget name in the status bar (marked with F in the 'Main Screen Overview'). If your connection has been successful, the PS Financials status light will turn green, and you are ready to begin transferring data between the two systems.PS Financials 'Data' Settings
To choose exactly which data is transferred between SBS Online and PS Financials, click Options -> PS Financials settings... and click on the Data tab. Here you can simply tick any option to have it be included in the synchronisation process. Note that you can have multiple items ticked, and that you can change them at any time. Once you have selected the desired items, clicking on the arrow buttons (marked with B in the 'Main Screen' section) will actually copy your data to or from SBS Online.Budget codes
If this is ticked, your 'Nominal Codes' in PS Financials will be copied to your SBS Online planner. Most codes will be added as Budget Codes, however any 'Balance Sheet Nominals' in PS Financials will be added as Unmappable Codes in SBS Online. Related settings: The CFR Keylist Title and GAG Keylist Title on the Advanced tab determine which PS Financials Analysis Codes are used to map your new Budget Codes to CFR and GAG codes respectively. The Overwrite SBS Online Budget Codes / Cost Centres setting determines whether to overwrite existing SBS Online Budget Codes with updated information, or only add missing Budget Codes and leave existing ones alone.Cost centres
If this is ticked, your 'Account Codes' from PS Financials will be copied to your SBS Online planner as Cost Centres. Related settings: The Cost Centre Ledger(s) setting on the Advanced tab determines from which Ledgers Cost Centres are drawn. The Overwrite SBS Online Budget Codes / Cost Centres setting determines whether to overwrite existing SBS Online Cost Centres with updated information, or only add missing Cost Centres and leave existing ones alone.Budget Monitor
If this is ticked you can populate your Budget Monitor and Profile Monitor for any given month with a single click. It collects year-to-date actuals, commitments and budgeted amounts from PS Financials and uploads them to your SBS Online planner.Note for Multi-School users: If you are connected to your 'parent' or 'Trust' SBS Online planner, you will upload Budget Monitor data for every school in your Trust as a single action.
Related settings: The Working or Allocated Budget and Original or Fixed Budget settings on the Budget Monitor tab describe which PS Financials budgets should be used as the 'Allocated' and 'Fixed' budget in your SBS Online Budget Monitor. The Budget Monitor date setting determines for which month your Budget Monitor is being run.Budget Import
If this is ticked, you can copy your SBS Online budget into a PS Financials budget. The budget which will be copied from your SBS Online planner (marked with F in the 'Main Screen Overview') is your current 'Default' budget. If you wish to synchronise a different budget, you will need to set it as the 'Default' budget. To do so, access your SBS Online planner, view the desired budget (within SBS Online, click 'Settings -> Budgets' and click on the budget name) and set it as the 'Default' budget by clicking the 'Make default' button. Close and restart SBS Online Sync, and verify that the desired budget is now selected. Before the budget is imported into PS Financials, you may wish to clear all or part of the existing PS Financials budget (see the Related settings section below). If unsure, it is recommended that you clear at least the relevant year of the budget; otherwise, you run the risk of 'mixing' two different budgets together - it is recommended you start with a clean slate each time. Related settings: The Working or Allocated Budget setting on the Budget Import tab describes which PS Financials budget will be updated. The Year of SBS Online budget to import setting controls which year from your budget is imported. The Before budget import setting allows you to choose several different options for clearing the PS Financials budget before copying in the SBS Online budget.Note for Multi-School users: If you are connected to your 'parent' or 'Trust' SBS Online planner and you have the Upload Multi-School budget from parent planner option checked, you will upload the Multi-School consolidated budget - containing data from all child schools - as a single action. If this setting is unticked, you will upload only the parent planner's individual budget. Additionally, the Clear only nominals that match schools' prefix setting can be used to selectively clear only parts of a budget belonging to a particular school.
PS Financials 'Budget Import' Settings
This section of configuration controls importing your budget plan from SBS Online into PS Financials (i.e. the Budget Import checkbox is ticked on the Data tab). To access, click Options -> PS Financials settings... and click on the Budget Import tab.Working or Allocated Budget
This should be the name of your 'working' PS Financials budget - the budget that you are updating and re-forecasting as the year progresses. This is the PS Financials budget that will be updated with data from SBS Online.Year of SBS Online budget to import
This controls which year (first, second, etc, through to fifth) of the SBS Online budget you wish to import into PS Financials. For example, if your SBS Online budget runs from September 2018 until August 2021, and you wish to import your budget for the financial year beginning September 2019 - the second year of your SBS Online budget - you would set this to '2'. Note that only a single year of data is imported to PS Financials; if you wish to copy more than a single year, simply run the import multiple times with this setting changed to a different year each time.Import Multi-School budget from parent planner
This setting is only relevant if you have a Multi-School SBS Online planner, and has no effect otherwise.Note for Multi-School users: If ticked, the consolidated Multi-School budget - including data from all child schools - will be copied into PS Financials when synchronising the budget. Otherwise, only the parent planners' individual budget will be used.
Before budget import
This settings controls how your PS Financials budget will be cleared of data before your budget is imported into PS Financials.- Do not clear 'Working or Allocated Budget': If selected, SBS Online Sync will not clear any data, and will combine your budget from SBS Online with any data that currently exists in your PS Financials budget. Note that SBS Online Sync will still update entries for a particular period / Nominal Code / Account Code combination that already exist in your PS Financials budget. Normally, this is not what you want and you should select a different option.
- Clear appropriate year of 'Working or Allocated Budget': If selected, only budget data relating to the year being imported (see the Year of SBS Online budget to import setting) will be cleared. Budget data for other periods will be left as-is.
- Clear entire 'Working or Allocated Budget': If selected the entire PS Financials budget will be cleared prior to import.
Clear only nominals that match schools' prefix
Usually, this setting only has an effect if you are part of a Multi-School SBS Online planner.Note for Multi-School users: If ticked, only those parts of your PS Financials budget which are against Nominal Codes for the currently connected school will be cleared. For example, if the SBS Online planner you are currently connected to has the nominal prefix 'SCH', only lines with Nominal Codes beginning with 'SCH' will be cleared before importing the budget. If Do not clear 'Working or Allocated Budget' is selected, or if the currently connected SBS Online planner does not have a configured Nominal Code prefix, this option has no effect.